
This is a follow on post from Using a Pi-hole to fight phishing.
I already had Pi-Hole running. It’s a fantastic tool for several reasons, namely:
- Allows you to block adverts and malware at a DNS level. This is much more effective than using ad-blockers. All devices on the network can be protected using this measure (as opposed to say just a browser on a single desktop PC).
- Allows you to block additional sites which you want.
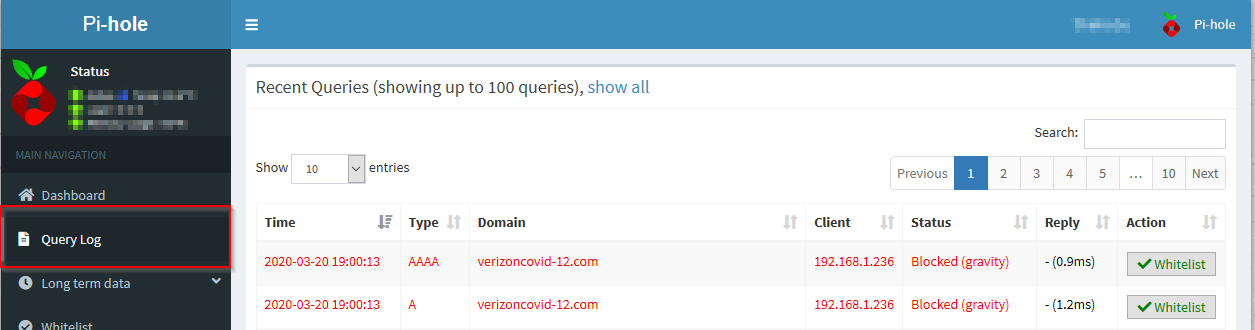
- Gives you visibility to what is happening on your own network.
- Allows you to leverage more secure DNS technologies such as DNS-over-HTTPS (DoH) for all devices.
My instance was running along with cloudflared proxy to allow for my external DNS requests to take place using DoH. However, I did have an issue where my connection seemed to drop or hang randomly. This started driving me up the wall some what. After further investigation I found the root case to be the DNS requests to Cloudflare:

So I did some digging around and came across a recommendation to use dnscrypt-proxy instead of cloudflared. After looking at it, I found this a better solution since not only does is support DoH and DNS over TLS (which cloudflared does as well), it also support DNSCrypt. So it is more versatile than cloudflared. Additionally, while I admire what Cloudflare does and provides, I would like to move aware from a single vendor for these type of things, and have something which makes it easy to switch my external DNS name resolver.
dnscrypt-proxy
Steps to install dnscrypt-proxy are pretty straight forward:
- Change the current directory to /opt:
cd /opt - Download the latest version:
sudo wget https://github.com/DNSCrypt/dnscrypt-proxy/releases/download/2.0.39/dnscrypt-proxy-linux_arm64-2.0.39.tar.gz - Unarchive the downloaded archive:
sudo tar -xvzf ./dnscrypt-proxy-linux_arm64-2.0.39.tar.gz - Remove the downloaded archive:
sudo rm dnscrypt-proxy-linux_arm64-2.0.39.tar.gz - Rename the unpacked directory: `sudo mv ./linux-x86_64 ./dnscrypt-proxy
- Change directory to dnscrypt-proxy:
cd dnscrypt-proxy - Create configuration from an example:
sudo cp ./example-dnscrypt-proxy.toml ./dnscrypt-proxy.toml - Edit the configuration:
server_names = ['cloudflare']# you can can change this and get a list of names from https://dnscrypt.info/public-serverslisten_addresses = ['127.0.0.1:54'] - Install the dnscrypt-proxy:
sudo ./dnscrypt-proxy -service install - Start dnscrypt-proxy:
sudo ./dnscrypt-proxy -service start
Pi-hole
Steps to install Pi-hole are pretty straight forward as well:
- In your home directory, clone the Pi-hole repository:
git clone --depth 1 https://github.com/pi-hole/pi-hole.git Pi-hole - Change directory to the install directory:
cd "Pi-hole/automated install/" - Run the installation script:
sudo bash basic-install.sh - Accept the defaults. You will have to set a name server, just choose any from the list (this will be changed later).
- Log into the Pi-hole Admin Web UI.
- Navigate to the Settings tab.
- Click on the DNS tab.
- Uncheck any Upstream DNS Servers which are selected and check Custom 1(IPv4) under and set the value to
127.0.0.1#54. - Save the changes.
- Test your setup:
dig @<pi-hole_ip> www.google.com(where <pi-hole_ip> is the IP address of your Pi-hole server). - If you want to setup TLS for your admin web UI, edit the file /etc/lighttpd/external.conf:
$HTTP["host"] == "<enter-appropriate-hostname>" {
  # Ensure the Pi-hole Block Page knows that this is not a blocked domain
  setenv.add-environment = ("fqdn" => "true")

  # Enable the SSL engine with a LE cert, only for this specific host
  $SERVER["socket"] == ":443" {
    ssl.engine = "enable"
    ssl.pemfile = "<certificate-and-private-key>"
    ssl.ca-file =  "<ca-cert>"
    ssl.honor-cipher-order = "enable"
    ssl.cipher-list = "EECDH+AESGCM:EDH+AESGCM:AES256+EECDH:AES256+EDH"
    ssl.use-compression = "disable"
    ssl.use-sslv2 = "disable"
    ssl.use-sslv3 = "disable"
  }

  # Redirect HTTP to HTTPS
  $HTTP["scheme"] == "http" {
    $HTTP["host"] =~ ".*" {
      url.redirect = (".*" => "https://%0$0")
    }
  }
}
- Restart lighttpd:
sudo systemctl restart lighttpd
This a slightly modified copy of a post which is available at: https://blog.sean-wright.com/dns-with-pi-hole-dnscrypt/
Note: The Cyber Volunteer 19 team recommend this setup for HOME use only. Hospitals and healthcare providers should use business class solutions for DNS services and protective DNS.